
China Custom Arduino Screen Supplier & Manufacturer
With over a decade focused on display technologies from our Shenzhen base, Oriental Technology delivers feature-rich yet cost-effective custom arduino screens engineered compatible with platforms like Arduino Uno requiring easy visibility and foolproof deployment.
People May Ask
Beginners will find the Arduino Software (IDE) easy to use, but more experienced users will find it sufficiently adaptable. The Arduino software is offered as an extensible open-source tool for programmers with skill.Oct. 13, 2022
Brightness. OLEDs and LCDs differ significantly in that LCDs have an LED backlight whereas OLEDs do not. OLED displays often have an edge in terms of individual pixel brightness because each pixel is separately illuminated.
Liquid Crystal Displays, or LCDs, are the most often used type of display in DIY projects. They are well-liked since they are simple to use and have a low power working range. Use I2C interface communication to link the Arduino board and LCD.
Here, we'll provide a post regarding an Arduino Dotmatix Display programming tutorial.
Materials Required for Step 1. You will require:...Step 2: Connecting the wiring. P10 LED Display and Arduino should be connected using the aforementioned pin setup.Connecting is step three. installation of the module as shown in the picture.
Step 5: Verify that it operates.
Your Portenta H7 now has professional-grade vision and audio capabilities thanks to the Portenta Vision Shield. Using this hardware add-on, you may use sound detection to turn on your system, connect wirelessly or over Ethernet to the Arduino Cloud or your own infrastructure, and run embedded computer vision applications.
" Instead of being a minicomputer, the Arduino Uno R3 is a microcontroller. A microcontroller is merely a small component of a larger computer. As a result, an Arduino only offers a portion of the capability that a Raspberry Pi does.
Before connecting the LCD screen to your Arduino board, we advise soldering a pin header strip to the connector's 14 (or 16) pin count, as seen in the figure above. Connect the following pins to your board in order to connect your LCD screen: digital pin 12 to LCD RS pin. Digital pin 11 to the LCD Enable pin.
7 Displays for Your Electronic Projects That Work with Arduino
TFT LCD screen. You can display vibrant images or graphics on the TFT display.a dot matrix. Eight by eight, 64 leds make up the dot matrix.OLED display in white.LCD with a 16 x 2 character display.The 5110 LCD display.Digital tube LED display with 4 bits.
The Context
Place the LCD screen vertically onto your breadboard so that each pin has its own distinct line.
Use the same procedure to insert your potentiometer.
Connect your breadboard's / - rails to the Arduino's 5v and GND ports.
Connect the LCD screen's Pins 1 and 16 to the negative power rail.
More things...•
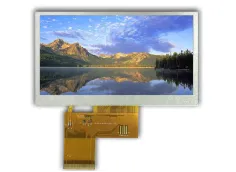
The backlit TFT LCD screen on the Arduino has a micro SD card port on the rear. With the help of the TFT library, you may create text, pictures, and shapes on the screen. Although it may be used with any Arduino board, the screen's pin configuration is made to fit conveniently into the socket of an Arduino Esplora and an Arduino Robot.
Arduino Screen Products
components sb Raspberry Pi Pico Board with Pico 4 Channel Expander, Raspberry Pi Pico Kit, and Pico I/O GPIO Expansion Board
IIC I2C Serial Tabellone with Auto-Luminous Display Frienda 10 Pieces I2C OLED Display Module OLED Display Screen Driver Compatible with the Raspberry PI (Blue) and Arduino

Freenove ESP32-S3 Development Kit with Onboard Camera, Wireless Stereo Speakers, Heart Rate Sensor, and Colorful Touch Screen, as well as Tutorial Code

Compatible with Arduino, Raspberry Pi, and STM32, Bicool 1.14inch LCD Display Module IPS Screen, 65K RGB Colors, 240x135 Resolution, Embedded ST7789 Driver
Yellow and Blue 0.96" OLED Display Module for Arduino, UCTRONICS 2 Pack, 12864 128x64 Pixel SSD1306 I2C Serial Mini Screen
Incompatible with Arduino/Raspberry Pi, Hosyond 5 Pieces 1.3 Inch IIC I2C OLED Display Module SH1106 Screen Module (White)

4.5-5.5V Blue Backlight HiLetgo 1602 LCD Expansion Shield Board for Arduino Duemilanove Robot

SPI Interface, Built-in ST7789V2 Chip, 1.9-inch LCD Display Module, 170x320 Resolution, 262K Colorful IPS Screen Display, for Raspberry Pi 4B/3B+/3B/2B/Zero/Zero W/Zero 2W/WH, for Arduino, STM32, etc.

Arduino-compatible EPLZON Solderable Breadboard PCB Board Gold-Plated Solder Breadboard for Do-It-Yourself Electronics Projects (5 Pack + 2 Mini Board, White, 3.5"x2.05")

Elikliv EDM9 7'' LCD Digital Microscope 1200X, 1080P Coin Microscope with 12MP Camera Sensor, Wired Remote, 10 LED Lights, Adult Soldering Electronic Microscope, Compatible with Windows/Mac OS
Related Products
News & Blog
Top Reviews
straight out of the box to work. If you haven't read previous pinout reviews, check D1Robot or do so now. A sketch is available that you can copy and run. Just keep in mind that this sort of pot requires a LOT of turns to reach the other end when adjusting the "pot" for contrast. You can use the nearby unused pins by soldering additional headers to the holes that are present. I mounted it downward, using a cutout for the display, and mounting the uno on standoffs. In case you're concerned, verify with a meter first. There were some soldering issues.
Although this shield is effective, seeking assistance proved challenging. The following details are what would have been very beneficial to know in advance: RS pin on LCD to digital pin 8 * Digital pin to LCD Enable pin 9 * Digital pin to LCD D4 pin Digital pin to LCD D5 pin: 4 Digital pin to LCD D6 pin: 5 Digital pin to LCD D7 pin: 6 7 The Liquid Crystal library examples won't function if you don't alter the aforementioned variables. There are several default pins in them. All of the buttons (apart from the reset button) are wired to AO using resistors. Following are the APPROXIMATE analog readings: Choose: 720 Left: 480 Down: 305 Up: 130 0 (this one is correct).
These modules from various manufacturers have been utilized by me. This one is also reliable so far, however they all share a significant problem. A transistor switches the back light led. Although a bipolar transistor was used by all suppliers despite the circuit being clearly designed for a MOSFET. There is a pull-up from the supply to the base, but there isn't a series resistor connecting the board pin to the base. In other words, a high on this output connects straight to the base of an NPN transistor, which has its emitter attached to ground. For that pin, that is essentially a short circuit. Two workarounds exist. Never output a high on that pin, if possible. If the backlight is off, only drag it down low.